Blockheadz!

I am coming out of hibernation for a special post about a product that I LOVE called Blockheadz!


What are they? They are 3D characitures (hmm, how is that spelt?) that come in a bunch of different celebrities… but the best part is that you can order yourself or someone else, and make them into a Blockhead! Or whatever famous person / character you want.

Where can you get them? You can order them from www.ghotigod.com

But first go like them on Facebook: “Are you a Blockhead?…. I am!”

Here are some examples:


Loaded Potato Soup


Look at me! Blogging two days in a row!!

This one will be a short one, I don’t have any pictures of the preperation of this soup, but it’s so easy it would almost be an insult to instruct you through it.

It’s great. I mean, look at it, creaminess, cheesyness, green onion, bacon.. All that yummyness in one bowl- can’t go wrong. And not to mention, it’s super easy to whip together. OH and one more thing- it’s made with 1% milk, so you won’t feel too guilty going for the second bowl you can’t resist 😉


Loaded Potato Soup

Prep Time: 25 mins | Cook Time: — | Servings: Yield: 4 servings | Difficulty: Easy

Ingredients:

  • 4 (6-ounce) red potatoes
  • 2 teaspoons olive oil
  • 1/2 cup chopped onion
  • 1 1/4 cups lower-sodium chicken broth
  • 3 tablespoons all-purpose flour
  • 2 cups 1% low-fat milk, divided
  • 1/4 cup reduced-fat sour cream
  • 1/2 teaspoon salt
  • 1/4 teaspoon freshly ground black pepper
  • 3 bacon slices, halved
  • 1/3 cup shredded cheddar cheese
  • 4 teaspoons thinly sliced green onions

Directions:

1. Pierce potatoes with a fork. Microwave on HIGH 13 minutes or until tender. Cut in half; cool slightly.

2. While potatoes cook, heat oil in a large saucepan over medium-high heat. Add onion; sauté 3 minutes. Add broth. Combine flour and 1/2 cup milk in measuring cup; add to pan then add the remaining 1 1/2 cups milk. Bring to a boil; stir often, being careful to not let the milk boil over. Cook 1 minute. Remove from heat; stir in sour cream, salt, and pepper.

3. Arrange bacon on a paper towel on a microwave-safe plate. Cover with a paper towel; microwave on HIGH for 4 minutes. Crumble bacon.

4. Scoop potato into soup and discard potato skins. Coarsely mash potatoes into soup using a potato masher. Ladle soup into four bowls and top with cheese, green onions, and bacon.

Source: http://www.handletheheat.com/2010/10/lightened-loaded-potato-soup.html


One thing to keep in mind: Make sure you let the potatoes cool down before you scoop them into the soup. I didn’t, and it hurt a lot (imagine burning hot potato mash all over your hands).


Enjoy!

Feta & Bacon Stuffed Chicken & Watermelon-Feta Arugula Salad

Well, Hello there.

It’s been a while, I know. That is what happens when I go to school, but on the brightside- I am HALF done my 5 year degree! Whoot whoot.

Since I haven’t blogged in forever, I thought I’d start back up again with an absolutely mouthwatering meal. Even thinking about it makes me hungry (& I just ate!)

One of the best things about this meal is that both parts, the chicken and the salad, use Feta so the block doesn’t sit in your fridge for a few months before you’re like “Oh crap! I forgot about the feta!” I served the feta in one block on top of the salad because that is how feta came on top of the Greek Salads in Greece, but feel free to crumble it.


The chicken is supossed to be stuffed, but my chicken breasts weren’t thick enough so I pounded them out some more and rolled the stuffing into them Cordon Blue style (Is it Blue or Bleu??)… anyway, they were delicious… messy to prepare, but yummy.

Before going to Greece I did not like feta at all. But with it being everywhere I had to eat it, and now I love it.
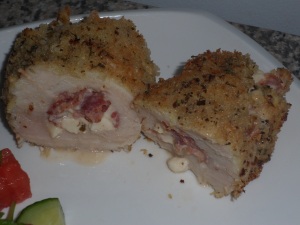
How to make it? If you really want to know…

Feta and Bacon Stuffed Chicken with Onion Mashed Potatoes

Prep Time: 30 Min | Cook Time: 35 Min | Servings: 3 chicken breasts | Difficulty: Easy

Ingredients:

  • 3/4 pound bacon, cut into 1 inch pieces
  • 1 cup crumbled feta cheese
  • 3 tablespoons sour cream
  • 1/8 tablespoon dried oregano
  • 1/8 teaspoon ground black pepper
  • 3 (4 ounce) skinless, boneless chicken breast halves
  • 1 cup all-purpose flour
  • 2 eggs, beaten
  • 1 cup dry bread crumbs
  • 4 potatoes, peeled and cubed
  • 1 sweet onion (such as Vidalia®), chopped
  • 2 tablespoons butter
  • 3 tablespoons sour cream

Directions:

Preheat an oven to 350 degrees F (175 degrees C). Place the bacon in a large, deep skillet, and cook over medium-high heat, turning occasionally, until evenly browned but still soft. Reserve the bacon grease in the skillet, and cool the bacon slices on a paper towel-lined plate. Once cool, mix the bacon together with the feta cheese, 3 tablespoons of sour cream, oregano, and black pepper in a small bowl; set aside.


Lay a chicken breast flat onto your work surface. Use the tip of a sharp boning or paring knife to cut a 2-inch pocket in the chicken breast. Repeat with the remaining chicken breasts. Spoon the bacon mixture into the pockets. Pour the flour, egg, and bread crumbs into separate, shallow dishes. Gently press the chicken breasts into the flour to coat. Dip each into the beaten egg, then press into bread crumbs.


Reheat the bacon grease over medium heat. Brown the chicken breasts on both sides in the hot fat, about 2 minutes per side. Reserve the bacon grease in the pan. Place the breasts on a baking dish, and bake in the preheated oven until the chicken is no longer pink and the filling is hot, 20 to 25 minutes. An instant-read thermometer inserted into the center should read at least 165 degrees F (74 degrees C).


Meanwhile, place the potatoes into a large pot and cover with salted water. Bring to a boil over high heat, then reduce heat to medium-low, cover, and simmer until tender, about 20 minutes. Drain.


While the potatoes are boiling, cook the onion in the remaining bacon grease over medium heat until very tender and golden brown, about 10 minutes. Once the potatoes are done, mash together with the onion, butter, and remaining 3 tablespoons of sour cream. Serve the chicken breasts accompanied by the mashed potatoes.

Nutritional Info:

Amount Per Serving Calories: 1498 | Total Fat: 84.2g | Cholesterol: 360mg Powered by ESHA Nutrient Database

Source: http://allrecipes.com/Recipe/Feta-and-Bacon-Stuffed-Chicken-with-Onion-Mashed-Potatoes/Detail.aspx?ms=1&prop25=58580727&prop26=DailyDish&prop27=2011-05-09&prop28=DailyRecipe&prop29=FullRecipePhoto&me=1


You may have noticed that the recipe has a side dish with it… I just ignored that. This time. I’ll probably try it with the chicken next time… Maybe next week actually.

Instead of those potatoes I made a salad. A delicious salad. Who does not love watermelon? I think in my entire lifetime I have heard one person actually say “I don’t like watermelon,” and I didn’t know them, it was at work.

The first time I encountered a watermelon salad was at a restraunt in Sudbury called Ripe, and it was instant love. Move over Buttermilk Nectarine Salad, there’s a new guy in town. It is so SO so refreshing, I think about it sometimes, just ‘pop’ in my head when I’m hungry but watermelon and feta are, unfortunately, not items I keep on hand. Maybe I should.

The salad is supper easy to whip together, the thing that took me the longest was cutting the cucumber because I bought a normal cucumber and not a seedless one- but, if you buy the correct cucumber it would take only as long as it takes to chop up a watermelon (unless you bought it pre-sliced, which I do not advise because it is a money scheme).

Another, yes, another good thing about this salad is that the left over watermelon can be used for breakfast or lunch the next day, or for a nice refreshing after school snack for kids (or college/university students!!)

Watermelon & Feta Salad Recipe

Prep Time: 20 minutes | Cook Time: 20 minutes | Servings: 4 Servings | Difficulty: Easy

Ingredients:

  • 2 Tbsp olive oil
  • 1 Tbsp white wine vinegar
  • 1 Tbsp fresh lime juice
  • Kosher salt and pepper
  • 1⁄4 small red onion, thinly sliced
  • 1-lb piece seedless watermelon
  • 1⁄2 seedless cucumber, sliced into half moons
  • 3 cups baby arugula
  • 3 oz feta cheese, crumbled (about 3/4 cup)

Directions:

1. In a large bowl, whisk together the oil, vinegar, lime juice, and 1/4 tsp each salt and pepper. Add the onion and let sit, tossing occasionally, for 10 minutes.

2. Meanwhile, remove and discard the watermelon rind. Cut the watermelon into thin 2-in. pieces.

3. Add the watermelon, cucumber and arugula to the bowl of onions and gently toss to combine. Top with the feta.

Source: http://www.womansday.com/Recipes/Watermelon-Feta-Salad-Recipe.html

So simple. So yummy, with the chicken, a great meal!!!

Individual Peach & Blackberry Pies!

Looks yummy- don’t it.

Living in an apartment with two people, my boyfriend and myself, desserts are a dangerous thing to make. Because, well, once I make one, we have to either eat it or waste it. Which is why I am always looking for desserts that are either already only two servings, or can easily be scaled down… like pie.

Using pre-made pie shell, I cut out circles using a peanut butter lid as a guide, and lined muffin tins with them. The stuffing is peach and blackberry, but you can use whatever pie filling you want.

For the top, I planned on doing a lattice, but they are so tiny that it was ugly. I settled on hearts- cute right.

One of the best things about them? They are so small that you don’t feel guilty adding ice cream- or eating a second! 😉

Peanut Butter Swirly Brownies

For the past month I have been having issues with lactose, but I’m getting better now… This recipe was something I made back when the issues first started, but I didn’t care… I saw the recipe in a Canadian Living magazine, and was like “Yepp, I’m making that RIGHT now,” so I made it right then.

I know that Brownies are ‘supossed’ to bake in a rectangle pan, but my only rectangle pan is HUGE, so I used a circle 🙂 (Hmm, maybe when I go grocery shopping tomorrow I will grab a normal sized rectangle pan)

These brownies were SUPER quick to make, and tasted like I had slaved all day working for hours to make the perfect brownies. No, it’s not magic. Well, maybe a little magic I like to call ‘Chocolate’

I don’t even remember them making me feel sick (which is what Dairy was doing to me), all I remember is being so excited to eat one, that I didn’t take very good pictures, I just cut out a chunck and shovelled it in!!

In fact, I don’t even remember what I had for dinner that day… I just remember the brownies.

Did I have dinner that day?

Probably.

But, that doesn’t matter… The important thing is that I made some yummy brownies, using a technique I had never used before (the swirl) and am thinking of using that in a blueberry cheesecake this week, using “real” blueberries. I’ve been living in Northern Ontario for over 2 years, and this will be my first time baking with Northern Ontarian blueberries… WISH ME LUCK.

Peanut Butter Swirly Brownies

Prep Time: 5 mins | Cook Time: 20 mins | Servings: 20 | Difficulty: Easy

Ingredients:

  • 1/2 cup (125 mL) smooth peanut butter
  • 1/2 cup (125 mL) butter
  • 2/3 cup (150 mL) granulated sugar
  • 3 egg
  • 1 tsp (5 mL) vanilla
  • 5 oz (142 g) bittersweet chocolate
  • 3/4 cup (175 mL) all-purpose flour
  • 1 tsp (5 mL) baking powder
  • 1 pinch salt

Directions:

In large bowl, beat 1/4 cup (60 mL) of the peanut butter, the butter and sugar; beat in eggs, 1 at a time. Beat in vanilla. Beat in chocolate.

Stir in flour, baking powder and salt. Spread in parchment paper–lined 8-inch (2 L) square metal cake pan.

By spoonfuls, drop remaining peanut butter over top. Run knife through batter to swirl; smooth top. Bake in 350°F (180°C) oven until tester inserted in centre comes out with a few moist crumbs clinging, about 20 minutes. Let cool in pan on rack. Cut into squares.

Nutritional Info:

Per square: about – cal 173 pro 4 g total fat 11 g sat. fat 5 g carb 15 g fibre 1 g chol 40 mg sodium 87 mg potassium 58 mg % RDI: – calcium 2 iron 5 vit A 5 folate 8

Source: http://www.canadianliving.com/food/peanut_butter_swirly_brownies.php

Slowcooker BBQ Ribs & Hashbrowns

I don’t make ribs often, they are pretty expensive for a student/poor person budget… but when I do, They HAVE to be Slowcooker BBQ Ribs! It is the most simple recipe I have ever made (easier than KD), and are SO so SO, fall off the bone, delicious. I can be stuffed to the point of exploding but I will finish every little bit of these ribs, no question.

So, how do you make these heavenly ribs?

Slow Cooker BBQ Ribs

Prep Time: 10 mins | Cook Time: 6 hrs | Servings: 2 servings | Difficulty: Easy

Ingredients:

  • 1 large Sweet Onion, sliced
  • 6 country-style pork ribs or beef short ribs
  • 2 (10ounce) bottles of barbeque sauce

Directions:

1. Lay the onion slices on the bottom of the slow cooker. Place the ribs on top of the onions. Pour the bottles of bbq sauce on top of the ribs and onions.

2. Cover and cook on low setting for 6 hours or more. The longer you cook them, the more tender and falling apart they will be.
Source: The Healthy College Cookbook

Them ribs is (improper English on purpose) sooo yummy, however, the ribs aren’t the only good thing about this meal. I loved each and every part of this meal… In fact, having to think about this meal makes me want to make it RIGHT NOW! But, I have something new and exciting planned for tonight. Feta and Bacon stuffed Chicken with a Watermelon Feta salad… oh yeah baby.


But, with the AMAZING ribs, I made Hashbrowns and Glazed carrots… The Hashbrowns were super easy and yummy, and the carrots were just as easy and gace the meal just a little bit of sweetness.

Hash Browns

Prep Time: 8 mins | Cook Time: 20 mins | Servings: 4 servings | Difficulty: Easy

Ingredients:

  • 2 Large Potatoes, scrubbed and diced
  • 2 tsp butter
  • 1 small onion, chopped

Directions:

1. Bring a medium pot of water to a boil. Salt the water and add the potatoes; cook until tender, about 10 minutes. Drain well.

2. Melt the butter in a large skillet over low heat. Add the potatoes and onion, cover, and cook for 10 minutes. Remove the lid, increase the heat to high, and saute until the potatoes are browned to your satisfaction.
Source: Healthy College Cookbook

Glazed Carrots

Prep Time: 0 min | Cook Time: 8 mins | Servings: 4 servings | Difficulty: Easy

Ingredients:

  • 1/4 cup water
  • 4 medium carrots, peeled and chopped
  • 1 tbsp honey
  • 1 tsp butter
  • Nutmeg

Directions:

1. Bring the water to a oil in a saucepan. Add the carrots, return to a boil, then reduce heat and simmer, covered, until the carrots are tender, 7 to 10 minutes. Drain.

2. Add the honey and butter to the hot saucepan, and stir until they are melted together. Add the carrots and gently toss. Sprinkle with nutmeg to taste.
Source: Healthy College Cookbook


Make this meal. ASAP. When you are making your mealplan and grocery list for the week, make sure these three dishes are on there, especially with it getting colder out (or is that just Northern Ontario??)

Now that I’m back at school for the year (Third year of University… Almost finished… almost!!), this meal will be FANTASTIC for those days where both Chris and I leave the ouse first thing in the morning and don’t get home until dinnertime and are STARVING. So, anyone in a similar situation, you’re welcome.

Enjoy 🙂

Mac n’ Cheese Soup


Most people cringe when I say I’m making “Mac n Cheese Soup”… but it’s actually very yummy. Or so I think, my brother doesn’t agree but he lives 4 hours away so I don’t really care.


I have decided to blog instead of putting away laundry and unpacking from my trip down south for the weekend. This is my second bought of procrastination- my first was heading to the mall today with my old roommate who moved back up to Sudbury while I was visiting my parents.

My mall trip was very exciting. I got some undies from La Senza, which should have ended up costing me $57 and I paid $1.17!! I had a card that they scratched at the cashier, and it could have been $5, $10, $50, or $500. And you know how it is, it’s always $5… Well, MINE was $50! Using that, plus my prestige card, I ended up paying $1.17!! Gotta love saving money… Which I then spent on other things 🙂

Going back to the soup. I made this last winter for my parents and brother, then a few weeks ago for Chris. This time I made it I used half Almond Milk and half normal milk, and couldn’t even tell the difference.

The soup is pretty much just a cheddar soup with macaroni noodles in it. Can’t go wrong there, not to mention my love for classic meals with a twist 🙂

Mac and Cheese Soup

Prep Time: 5 mins | Cook Time: 25 mins | Servings: 4 serving | Difficulty: Easy

Ingredients:

  • Kosher salt
  • 4 oz elbow macaroni
  • Cooking spray
  • Freshly ground pepper
  • 3 shallots
  • 1 carrot, cut into 1-in pieces
  • 1 stalk celery, cut into 1-in pieces
  • 1/4 cup all-purpose flour
  • 3 3/4 cups fat-free low-sodium chicken broth
  • 11/4 cup 2% milk
  • 6 oz shredded cheese (1 1/2 cups)
  • 1/4 cup Parmesan cheese

Directions:

Bring medium saucepan of salted water to a boil. Add macaroni and cook, drain.

Mince the shallots, carrot, and celery in a food processor. Mist a saucepan with cooking spray. Add the vegetables and cook over medium-high heat until softened, 4-5 mins. Add the flour and cook, stirring, 2 minutes. Gradually stir in broth and bring to a boil; cook, stirring, until thickened, 6 to 7 minutes. Remove from heat.

Add the milk, cheeses, and macaroni and stir until cheeses melt. Season with pepper. Serve.

And this ^^ is some Summer Sparkle, which I found in one of my MANY MANY cookbooks. It’s Grapefruit juice, OJ Concentrate, Lemonade Concentrate, and Sprite 🙂 Yummy yummy.


Random Paper Craft

Alright, so, the other night (about two weeks ago) Chris and I watched Big Brother (obviously) and then Rookie Blue came on… which Chris loves, and I am jsut getting into now that it comes on after Big Brother and it’s on the T.V. I had that late night-prebedtime energy rush and my eyes shifted from the T.V. down to the ugly Kinect box that we have been using as a stand for the Kinect and I decided to do something about it…

I went into the spare-room immediately and pulled out my dollar store package of craft paper. Then came the scissors, glue, and tape. I didn’t know what I was going to do exactly but I had the necessary tools to do it.

I started by wraping the front half of the box with black paper, which proved much more difficult than I thought it would be because of the way that the box opens. Then I cut a bunch of colours into strips and weaved them, then attached it to the front…. It’s not as long as the box, but I don’t really care, this make-shift stand is jsut until I find something a bit more sound. 

This is how it turned out, pretty cute for a last second – late night – 10 minute project. I must say.

While the paper and glue were still out I tackled one of the things on my “List of things to do this Summer”… and made a paper garland. I would LOVE to give credit where it is due and tell you the blog I found this on, but I can’t remember what it is… and if you google Paper garland, you get 1,910,000 results. Sorry!

I actually love the crappy dollarstore coloured paper for this, I think it looks kinda nice all faded like.

This is how I have it on my media stand right now, next to the Kinect box I covered.

Then, one last thing I did with some scrap paper before going to bed was make this paper ring. I learnt this a long time ago, in girl guides or something, I think in the fifth grade…

Here is a website with good, clear instructions on how to make your own. I suggest using better paper than construction paper, since it gets pretty difficult to fold if you use construction paper. I remember making them out of old wrapping paper. Maybe it was sixth grade? I don’t remember.

Well, that was my hour of craftyness. But it did spark something in my mind to get on top of my list of things do to this summer, since summer is almost over.

By the way… For anyone living in Toronto, or the surrounding area… Next weekend at the Metro Toronto Convention Centre is Fan Expo Canada from August 25-28th. It’s the first time that Fan Expo has been four days in Toronto- since last year was SO successful, and people were lined up around 2 blocks to get in, they extended it. I HIGLY suggest that EVERYONE go, and come see the Blockheadz stand, we are going to be located right by the DC area of FanExpo. Say that you came to see Veronica and I’ll give you a deal.

Blockheadz are personalized 3D charicatures. Get yourself, your friends or family made into Blockheadz for birthdays or christmas. PicK up one of our MANY Fan Art collectable pieces, or order your favorite character.

Check out Fan Expo Canada’s Website: http://www.fanexpocanada.com/

OR, even better, Check out Blockheadz website: http://www.ghotigod.com/
OR EVEN BETTER THAN THAT, ‘Like’ Blockheadz on Facebook at ‘Are you a Blockhead… I am’… go, do it… NOW.

Pecan Crusted Chicken Strips & Cucumber Salad

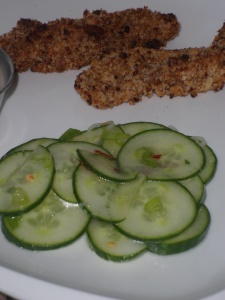
These Pecan Crusted Chicken Strips are so very yummy and easy to make. And SO much healthier than the frozen chicken strip variety. I made them once when I visited my parents.

I really enjoy going home and making dinner for my family. It’s almost like going home and saying, “Hey look what I can do!!” Looking back now that I have been out of my parents house for nearly two years there are only a few meals that my mum would make that stand out to me Monster Brains (tortelini in a creamy cheese sauce), Curry, and a few others. My family ate very generic ‘family friendly’ meals and, don’t get me wrong I loved dinner, but I enjoy having different meals week after week and trying new meals.

So now, whenever I go home I make meals that are ‘family friendly’ with a twist. A meal we had often enough when I was younger was chicken strip wraps. Frozen Chicken strips, baked, and used as the protein in wraps for dinner.

So one week when I was visiting home, I made Pecan Crusted chicken strips. They were really good, so the other week I made them for Chris.

When I made them for my family, I served them with ‘bacon fries’ I.E. French fries that have been tossed in Bacon Salt, which I saw in a food network magazine- Coarse salt mixed with crispy bacon that has been food processed to the same consistency as the salt.

When I made them for Chris I took a healthier approach to sides, and make Cucumber Salad. From Canadian Living.

These chicken strips are something I will make for my kids, when I have some, and when they think back to meals they had as kids they will remember Mum’s Pecan Crusted Chicken Strip wraps. But I won’t make then too too often, because I don’t like repeating recipes too often. I like making new things every week.

Pecan-Crusted Chicken Fingers

Prep Time: 10 mins | Cook Time: 14 mins | Servings: 6 serving | Difficulty: Easy

Ingredients:

  • 1 1/2 lb boneless skinless chicken breasts, pounded thin and cut into strips
  • 1/3 cup flour
  • 2 tsp chili powder
  • 1/2 tsp each salt and pepper
  • 2 eggs
  • 1 1/2 cups finely chopped pecans
  • 1/2 cup panko

Directions:

In shallow dish, whack together flour, 1 tsp chili powder, salt and pepper.

In Separate bowl, beat eggs.

In another shallow dish, place pecans, panko, and remaining chili powder.

One at a time, dip chicken strips into flour, then egg, then pecan mixture.

Bake on parchment paper lined baking sheet at 425 until golden and no longer pink inside, about 25 minutes.


Cucumber Salad:

  • 1/3 cup (75 mL) rice vinegar
  • 2 tsp (10 mL) liquid honey
  • 1 tsp (5 mL) sesame oil
  • 1/4 tsp (1 mL) hot pepper flakes
  • 1/4 tsp (1 mL) salt
  • 1 English cucumber, thinly sliced diagonally
  • 2 green onions, thinly sliced

In large bowl, whisk together vinegar, honey, sesame oil, hot pepper flakes and salt. Add cucumber and mix until coated; set aside in refrigerator until ready to serve. Stir in green onion.

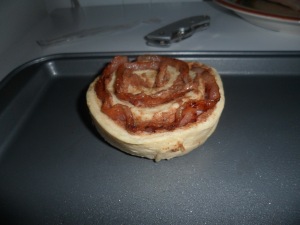
Bacon Cinnamon Buns <3


Bacon. Cinnamon. Buns.

It’s as amazing as it sounds.

Why do I have an obsession with Bacon?

Why do I strongly believe that Bacon is the best food in the world?

My daddy. My dad loves Bacon, ipso-facto, I love Bacon. As does my amazing Boyfriend Chris (who is driving me crazy right this second!!!!)

So, when I have an oppurtunity to take something delicious and Baconize it, I do not hesitate.

Don’t forget to cook the bacon for about 2 minutes on each side before using it in the Cinnamon rolls.

I made these one Sunday morning for Chris and I we each started with one but ended up having two each because they are SO good. But, I won’t be making them often because they are very unhealthy, and impossible to not eat right away.

Om nom nom.


BTW- I did not come up with this idea (although I wish I had). I found it on the blog Rainy Day Gal while stumbling. Man I love StumbleUpon.